Monday, July 29, 2013

FCCB # 171--Shaped Cards

If you've visited this blog on a regular basis, you know that shaped cards are one of my very favorite things to make.  They are just so fun!  And that is our challenge this week for Fantabulous Cricut!  You can play along--just create a shaped card being sure to use at least ONE Cricut cut.  

One of the women I work with in the OR has a not-quite two-year-old boy (one of a set of twins) who needs heart surgery.  They will be going up to KC in a couple of weeks to get it done.  The twins were very premature and spent a lot of time in the hospital after they were born but have really done very well!  Anyhow, I made this card for him (really his mom LOL).


I used the Teddy Bear Parade Lite cartridge--one of the most fun carts PC has ever released.  Bear measures 6.5"  tall.  I welded two of the shapes together (one is flipped) and cut the rest of the layers.  I added stickles to the heart on the X-ray and the stethoscope.  Scrub layers are popped up on foam tape.


Inside is a sentiment from the retired SU Build a Bear set.  I am so glad I kept it because it is perfect for cuts from this cartridge!  

I love this card.  I hope it lets my friend know that I care about her and her son and will be praying for his quick recovery.

Thanks for dropping by today, and don't for get to play along with FCCB this week!

Saturday, July 27, 2013

Eagle Scout Card


My nephew Robert is having his Eagle Scout Court of Honor tomorrow.  We will be driving to their town and I will have a part in the ceremony.  We're very proud of him--he has worked very hard to achieve this honor.


I just got these two new stamp sets from Our Daily Bread Designs, Some Gave All (star-spangled eagle) and Keep Climbing (mountain scene).  I am a sucker for ODBD's eagle stamps.  It's very hard to tell, but I used  their Old Flag BG stamp on the Real Red layer.  I used Night of Navy on Bordering Blue CS.  


For the second one I used On Eagles' Wings for the eagle.  This one is actually more Boy Scout-y than the first--the DP is from a BSA paper pad, and I used some yellow hemp.  Mountains are stamped with Always Artichoke on Crumb Cake.

I like them both but think I will use the first one for Robert's ceremony, just because I like that star-spangled eagle!

Thanks for taking a look!  Have a great day!


Monday, July 22, 2013

FCCB Challenge # 170--Fruit Salad

Here is my card for FCCB challenge # 170.  The Theme is Fruit Salad.  Just make anything you choose--card, layout, decor, gift packaging with a fruit theme, and be sure to include at least ONE Cricut cut!

I love strawberries!  Some of my fondest memories are of taking my kids to the U-pick strawberry farm in Wilmington, NC.  And they are so pretty, not just the fruit but the flowers as well.


This adorable strawberry is from Rock Princess, of all cartridges, and to be honest, it doesn't really seem to go with the rest of the cartridge.  BUT, I won't quibble, because I love this cut.  Card base and Nestie cut oval are Poppy Parade,  plain oval is Blushing Bride.  DP is Eat Cake.  I used my Cricut markers to add definition to the cut and popped up my flowers and strawberry with foam tapel  Ribbon is Daffodil Delight taffeta.  I used an SU border punch on the bottom.  This card doesn't have a sentiment on it, but it would make a good birthday or thank-you card I think.

Speaking of fruit salad, the kids and I went to Applebee's (Em's FAVE restaurant) and I got their Summer Berry Salad.  It has spinach, bleu cheese, blueberries, strawberries, pecans and grilled chicken, with some kind of sweet dressing.   Theirs was good, and I thought would be easy to make at home.  Which I did, and it was yummy.  Matt said "Blueberries taste like summer".  Then of course we all had to weigh in with other summery-tasting fruits, the most popular being watermelon, strawberries and cantaloupe.  What is your favorite fruit in the summer?

Thanks for dropping by!  Have a fun-filled day!  Don't forget to play along with FCCB this week!


Thursday, July 18, 2013

Baby Banner


OK, I should have posted about this a long Time ago.  This is my project that got Published in the Cricut Babies Idea Book (see my sidebar).  Here is my beautiful daughter holding it up.


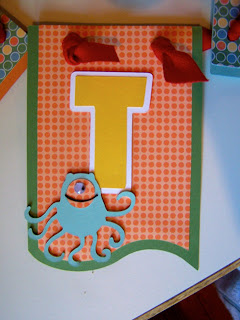
I made this for a friend who adopted a baby boy who is now 18 months old!  She wanted to decorate his room in bright colors with a monster theme.  I was pretty excited because I'd never heard of a monster-themed baby's room before, but I loved the idea.  And it just so happened that I had THE perfect Cricut cartridge to get the job done--Mini Monsters!  The banner flags were cut from Birthday Bash, which has an awesome assortment of different-shaped pennants.  They were cut at 5".


The DP is SU's old Eat Cake.  I loved that paper, and it was perfect for the bright colors Ashley had selected for her baby's room.  The letters are from the Robotz cartridge at 2.5".


The monsters were all cut at 2".  I had a blast choosing colors and embossing folders to simulate scales and warts!


I didn't cut any eyes.  Instead I used wiggle eyes, different sizes as often as possible!


The monsters are all popped up with foam tape, as are the letters.


Colors are Poppy Parade, Wild Wasabi, Daffodil Delight, Pumpkin Pie, and Baja Breeze, plus white for those fangs!


I also flipped some of the banner pieces so it wouldn't look all matchy-matchy.


Ribbon is some I had in my stash.


Once this was accepted for publication, I was supposed to send it to them.  Well of course it was already decorating Prescott's room!  So I made ANOTHER ONE!  What can I say, I will do anything for recognition LOL!  They have since moved and Baby P's room now has two windows instead of one, so he has a banner for each window now (they send the project back after the publication comes out).


Of course I had to make a card and gift bag to match.


The inside sentiment was an obvious choice.  I did it on the computer.


Here is the gift bag.  Circles are from Accent Essentials.  

I know this project looks like it was a lot of work, but really, once you have chosen your papers it goes pretty fast.  The Cricut is one awesome machine--I LOVE mine.

Thanks for dropping by and taking a look.  You can buy a copy of the Cricut Babies Idea Book online at Northridge Publishing.  I am on pp. 54-55.  Have an awesome day!

Wednesday, July 17, 2013

CTMH Laughing Lola Layout

Sadly for me, girly LO's are not really my strong suit.  But I knew what pictures I wanted to work with when I got my Laughing Lola Workshop on the Go kit in my new consultant kit.  These are from the Girl Scout Father-Daughter dance that Ems and her dad went to in Feb 2012.  She was supposed to go this year, but when she found out none of her friends were going she bailed.  It has been a looong time since I made a layout of any variety, so be gentle LOL!


For the title I used the fonts on the Artbooking and Art Philosophy cartridges.  I just love that curvy font--it's so girly and hippie-ish!  "Dance" was cut from AP at 1.25".  "Father-Daughter" was cut at 1.5".  The flowers are chipboard embellies that came in the kit.  I stamped a little border from the stamp set that came with the kit in Gypsy over and under the first and third pix because the photo mat looked a little naked.


For this page I cut the journaling piece at 4' Real Dial Size and stamped the matching image.  Then I stamped "Lovely" and "Sweet" from the set Sweet and Lovely that came with my Cricut Artbooking bundle.  The "&" is cut at .75" from Artbooking.  The flourish is from Swirls Around, which was included in my new consultant's kit.  "Epic" is another included chipboard embellie, and so are the bow and the little jewel on the journaling tag.  I stamped and cut out the flower from the Laughing Lola set.


Here they are together.  This is a great kit if you have daughters or you are a girly-girl yourself.  You can order it from me at my CTMH website HERE.

Thanks for taking a peek!  Have an awesome day!

Monday, July 15, 2013

FCCB Challenge # 169--Set the Scene


Today's challenge over at Fantabulous Cricut is called "Set the Scene"!  We were to make a scene of some sort, using at least one Cricut cut.


I was going to go with a beach scene, but then I remembered this fun sunrise background scene from the Country Life cartridge.  Because of the rooster, I knew I'd have to make my card large.  I used my Gypsy to size the sunrise scene to 8.25" wide--makes it about 4.5" tall, and I sponged the edges of the sun.  The fence is cut twice from the Old West cartridge at 1.5" tall.  I used Cricut markers to add detail.  Then I trimmed off one of the posts and adhered both sections to my background with foam tape.  The rooster is from the Just Because cartridge, and because it's sized for a card, I used my G to make the rooster itself about 2" tall.  I popped him up with a double layer of foam tape.  I sponged a piece of Blush Blossom with Crisp Cantaloupe and Calypso Coral and adhered my scene.  I used the CTMH Artiste cartridge to cut Hello at 1.25".  I used a Cricut marker on this as well, and popped it up.

I really had a great time making this card, and I hope you will play along with us over at FCCB!

Thanks for stopping by!

Friday, July 12, 2013

My First Card as a CTMH Consultant

Hi, everyone,  I got my CTMH new consultant's kit yesterday and finally had the chance to play with it today.  I used the Laughing Lola Workshop on the Go kit and my CTMH Cricut Artiste bundle that I got some time ago.  It comes with three stamp sets and dimensional elements, and the cut sizes are noted on the stamp set and the chipboard set.  It makes it super easy to create perfect cards!  The "hello" is sized at 2".  The Laughing Lola kit also comes with black hemp and these cool irridescent stick on jewels.  I'm pleased with how this turned out and look forward to making some more!


Don't forget you can order CTMH products from me  HERE!  You won't be able to order this awesome kit until August 1, but you CAN order from the Spring/Summer Idea Book until then.  Thanks for dropping by!   

Tuesday, July 9, 2013

Blog Candy Winner and Announcement

Hi, everyone, it's time I announced the winner of my Fantabulous Cricut Crawl Blog Candy.  I had my daughter draw a # out of a hat and that # was 13.  Comment # 13 was:

Blogger Dakota Bear said...

Very nice wreath! I never heard of Glubers. I like using the hot glue to hold the rosettes together.
July 1, 2013 at 11:47 AM
 
Congratulations, Dakota Bear!  Email me your mailing addy so I can send you your hot glue gun!


And now, drumroll please....
 
I have signed up as a Close To My Heart consultant!  So if you are in need of any CTMH products, please let me know!  Here is the link to my CTMH website. You can create a customer account and shop directly from there.  You can also access Studio J, CTMH's digital scrapbooking software, from my website as well if you are interested in that.  Though I haven't done much with digi scrapping, I played around with it last night some and it is pretty user friendly.  So give it a try!  I'd love it if you dropped by, just to take a look.  Thanks!

Monday, July 8, 2013

FCCB Challenge Me Monday # 168

Today's FCCB challenge is Cute as a Bug--make a card with a bug on it!  I made a shaped card.  Some of you might recognize this cut (from Boys Will Be Boys) from a couple of posts ago--I used it for the science room at our VBS.  Here I cut two bases from white, scored the bottom one, and used sticky strip to attach the front to the back.  I then cut the layers and assembled the card, complete with wiggle eye for the ladybug.


I usually weld two shapes with my Gypsy, but doing it this way allowed me to tie the baker's twine all the way around the top.  I used an old SU stamp for the sentiment.


Here is a pic that shows the inside.  It measures slightly smaller than 5.5" x 4.25".  I like the way this card turned out.  I plan to send it to my sis, who is going through some rough times right now.

Please play along with the Fantabulous Cricut Design Team!  Make any type of project with a bug on it, and make sure to include at least one Cricut cut!  There are tons of cartridges with awesome bugs on them--Create a Critter, Walk In My Garden, and Stretch Your Imagination are just a very few.  When you are done, link up your project to the Challenge Me Monday # 168 post at FCCB.

Thanks for dropping by today!  Have a wonderful day.

Thursday, July 4, 2013

4th of July Card for My Mom and Dad


Soooo...I loved the Chevron Cover Plate dies that PTI introduced with their last release and HAD to have them--both the portrait and the landscape.  Finally got around to playing with them.  I die cut the plate 3 times:  once in Baja Breeze, once in Blue Bayou, and once in Riding Hood Red.  I then used all the little pieces/parts to make 3 different cards.  You just pop out the chevron pieces and pop them back in where you want them, as Nichole Heady demonstrated in her post here.  I will show the others at a later date--think I will use them for OWH cards or something.  But I needed a 4th of July card for my parents.  As it turns out, I do not have ONE SINGLE STAMP that says Happy 4th of July.  But I did have this very old SU set, so I used it and just hand wrote the sentiment on the inside.  


I stamped the image (which says We the people at the top, it's a bit hard to read, sorry!)  in Blue Bayou on Baja Breeze, and used some Baja ribbon with a We R Memory Keepers star stick pin.  

Well, thanks for stopping by today, and Happy Independence Day to you all!

Wednesday, July 3, 2013

More Door Decorations and Blog Candy Winner

So it seems most of the other FCCB DT members who are offering blog candy are going to draw for it on Monday, so I thought I'd extend mine as well to give more people an opportunity to enter if they wish.  

In the meantime, I thought I'd show you some more of the Cricut shapes I made for VBS door decorations.  These were for the art room.


My favorite is the artists' palette.  


All of these are from the Recess cartridge I think.  One or two may be from Locker Talk.


Couldn't resist using glitter CS and an orange brad on the scissors!


And I had to make my glue look like Elmer's LOL!

Had fun making these--Cricut-ting is so much fun!

Monday, July 1, 2013

Fantabulous Cricut Crawl--Red, White & Blue! Plus Blog Candy!

Welcome to The Stamping Tree and the Fourth of July Fantabulous Cricut Crawl!  I'm very excited as this is my first post as a FCCB design team member.  In honor of the 4th of July holiday, we're having a Red, White and Blue Crawl.  Each Design Team member has created a fabulous project using Red, White and Blue as the main colors, and of course at least one Cricut cut!


If you've come from Fantabulous Cricut Challenge Blog, you're in the right place!  If you've just happened across my blog and would like to see all the fabulous Design Team creations head on over to Fantabulous Cricut HERE  to start at the beginning.

Make sure to check out each DT member's blog!  There will be Blog Candy along the way at some of our DT members' blogs, and there will be a Grand Prize up for grabs at FCCB for one participant who submits a "Red White and Blue" project at FCCB!

I wanted to show you a pic of my inspiration--I saw this wreath while in Kohl's a year ago.  I knew right away I wanted to use Ribbons and Rosettes to make my own version, and I found some gorgeous paper from We R Memory Keepers.  Unfortunately, I didn't get my project made for last 4th of July, so when I saw the Crawl theme, I knew I had to make it.


Here is a picture of my project:


I cut various rosette patterns in sizes ranging from 1.5" to 3".  I welded the rosette sections with my Gypsy so that I could have long strips to work with.  The stars are cut from Stand and Salute, and I Love USA is from Independence Day.  SU Baja Breeze, Riding Hood Red, and Blue Bayou coordinated perfectly with my patterned paper.  I tried a couple of different methods to assemble my rosettes after the strips were joined at the ends.  First I tried Glubers--those really big glue dots.  Sometimes it worked, and sometimes not.  The method I liked the best was applying hot glue to a cardstock circle and pushing my rosette down into the hot glue.  I painted a 12" wooden wreath form from Michael's white and adhered my rosettes.

And speaking of hot glue, here is my blog candy!  A brand new Imaginisce I-Bond!  I have one and I love it.  It's cordless and has a little light on the nozzle.  


How can you win?  Leave me a comment with a way to contact you--that's it!  On Wednesday I will randomly draw a name for the winner.  

Your next stop is  Amy T at Crafting With Amy. Make sure to visit all the stops along the way and when you get done, make sure you link up your project to FCCB's Fantabulous Cricut Crawl post!!

Happy Crawling!!

Here is the line up in case you get lost:


Thanks for crawling with us at  FCCB!  Happy Independence Day!