Showing posts with label SCAL. Show all posts

Thursday, August 4, 2011

He's Got the Whole World in His Hands

This is the card I made for our church members to sign for our Christian Ed coordinator who is leaving. A while back, I discovered how you can use SCAL and Lettering Delights images together to do a kind of "print and cut" a la the Cricut Imagine. It is a trifle labor intensive, but I did make a few images this way and this image of the kids around the world holding hands really appealed to me. I have saved it all this time with the intention of making this very card, which I finally did. I printed the words to the song in various colors for my BG. I edged around the main image with a marker, which didn't turn out as well as I'd hoped, but it looks okay I guess. I stamped a couple of sentiments from ODBD on the inside.
Thanks for looking! Have a fabulous day!

Wednesday, February 16, 2011

Pet Friends Valentines

Okay, so here's the last of 'em. I had so much fun making these. Lettering Delights really put a lot of thought into the layers so that there's not too much cutting on most of them. I just love the little kitty's whiskers here, don't you? Embossing Folder is Cuttlebug.
Now there WAS a fair amount of layering on the dog. Ems wanted a brown and white dog, but of course I had to add a few other colors and some sponging. The dog is the only one that got sponged, and I don't know but that he may be the cutest one of all because of it. And don't you just love that tongue hanging out? Too funny!
And here they are together, the best of friends! I hope you all and your kids had a great Valentine's Day! I'll be so sad when I don't get to make kiddie valentines anymore.
Thanks for looking!

Jungle Love

Here are a couple more Lettering Delights Animal Boxes and Bags SVG valentines. LD has since fixed this problem, but when I went to make the lion, the front panel with the tail wasn't there. So I used the front panel for the cat (in the next post) and used the tuft from the lion file on the end. I think it looks fine. I used the SU Square Lattice embossing folder on the lion.
I think the embossing folder on the elephant is called Mesh, by Cuttlebug. As usual, all CS by SU. I find that the Tombow Mono Multi is excellent glue for putting any of these things together. It has a very fine tip and dries fast and strong. If you haven't tried it, I highly recommend it.
The purples I used on the elephant are both retired, as is the pink I used for the hearts.
I think the lion is my favorite of the animal valentines--I love lions. Born Free was my favorite movie when I was a little girl. Thanks for stopping by today!

Forest Friends Valentines

In the previous post I showed you the valentines I made for the boys in Emily's class and some of her friends around the neighborhood. For the girls we made various animals, two or three of each of 6 designs. Emily chose which animals and the colors to use. Here is the owl. I know many of you know that I don't get the current owl craze, but I think this one turned out just darling. Who knows? I could grow to love owls.
Here is the bunny. Now I have to say, this is the only design I don't like in this set. Do you remember that old Bugs Bunny cartoon, where he drinks some Jekyll and Hyde potion or something and turns into Neanderthal bunny? That's what this reminds me of. This gives me the creeps! But Emily liked it. I wish I'd have had some large pompoms to use on the tail, but I only had tiny ones, so it's just a cardstock tail.
All CS is SU, embossing folders are Cuttlebug. I used little squares of Velcro to hold the bags shut. We stamped a t0/from on the back and Ems wrote everyone's names on them.
They look kind of cute together, don't they? I don't know, maybe the bunny isn't SO bad. More valentines to come!

Monsters vs. Robots

No, it's not a new kids' movie--it's the Valentines I made for the boys in Emily's class! I used Lettering Delights Animal Boxes and Bags SVG set and Sure Cuts a Lot.
This SVG set is so easy to use! My carpal tunnel loves LD and SCAL. I opened each animal file, broke it into its component layers, and added the bag file. Then I selected everything and resized it to be a bit bigger.
I used the heart from the monkey file and selected Auto Fill, so I cut a whole page of hearts--way more than I actually needed. I'll figure out some way to use them! All CS is SU, all embossing folders are Cuttlebug.
In a fight to determine the cutest boy valentine, who would win? Personally, I think it's the monster, but I love them both! I owe a big thank you to Jin Yong over at Under a Cherry Tree--her blog is so creative and inspiring! Thanks for looking and have a great day!

Thursday, October 28, 2010

Halloween Door Decorations


In my quest to try all crafts Cricut, I made these vinyl door decorations for Halloween. The haunted house and scary tree are from the Happy Hauntings cartridge and the trick or treaters are an SVG file I downloaded from HERE and cut using SCAL. I cut the house at 11.5", the tree at 10" (I think; I know it was a little smaller than the house), and the kids at 3".


The words were cut using the vampire font on Happy Hauntings on this smashing orange glittery vinyl at 1.5". I pressed shift for the W on Witches, but for some reason it didn't take, so it's all lower case. By this time I was getting a little frustrated with the project so I decided to let it go. I wish you could see this vinyl IRL; it looks really cool.

Here is a picture of the whole thing. I'm basically pleased with the way it turned out. My DD and her friend told me I was becoming an EXPERT with the Cricut--wasn't that sweet? I learned a lot, especially that maybe I should stick with paper crafting and leave the vinyl alone! However, since I went on a vinyl-buying binge a few weeks ago at Oh My Crafts, I will very likely continue to use it, at least until that's all gone! I already have plans for a wreath door decoration. I'm just sorry I got this up so late, since it will have to come down in a few days. Why does Halloween only come once a year? I love it so!
Posted by Picasa

Thursday, October 7, 2010

Test Tube Holder

My friend Michele (who is a chemistry teacher as well as a stamper) found this test tube holder, and I saw it on her blog HERE. Well, obsessed as I am with all things Halloween-y and science oriented, I had to know where she'd found it, and that was how I discovered My Graphico. They have clip art, digi papers, digi stamps, and of course, my current obsession, svg templates for use with SCAL and Cricut. I immediately placed an order and decided to use the template ( by Lindsay's Stamp Stuff) for my stamp club swaps. (I only had to make three LOL! Although it was actually very easy to put together--it's the dressing up of the project that takes the time.) I used SU's Wicked Cool stamp set and their Wicked Fun Specialty designer paper. Don't you just love the word "wicked"? It's so...wicked! I had seen this bone candy at Target last year, and they had it again this year. It comes in little plastic chemistry set-type flasks, in two different colors--orange/green/white and blue/purple/white. And I ordered the tubes a long time ago when I was still an SU demo--aren't the cork stoppers great? A real test tube would have a rubber stopper of course! CS colors are Rich Razzleberry, Old Olive, Basic Black, and Whisper White. I used almost every stamp in the set. The witch's stockings are colored with a Really Rust marker, which is a pretty good match for Cajun Craze. I also used Going Gray, Old Olive, and Summer Sun markers. "Spooky" is stamped with Cajun Craze ink, and I inked up the spider web with Going Gray and stamped it off once before stamping over "spooky". Oval and tag punches are SU. The "spooky", hat, and boots are all cut out and popped up on foam tape. Which means I can also enter it in the My Graphico Challenge #69--how cool is that? Well, thanks for stopping by, and I hope you've had some time to make something fun today!

Friday, October 1, 2010

Sept. Teacher Birthday Cards, part 2

These two cards are for the teachers I don't know. This first card is for a teacher named Chris, so I really don't know if that's a man or a woman. Here's hoping it's a woman, because this is a trifle girly for a guy! I used a retired SU set called Branch Out. Card Base is Really Rust, layer is Cajun Craze. I used PTI Vintage Cream and DP. I used More Mustard, Really Rust, Pumpkin Pie, and Ruby Red markers for the leaves, Early Espresso for the trunk, and Palette Noir for the tire swing. Vintage Cream twill and fall Dew Drops were used to embellish. I used Penny Duncan Creations Shaplies SVG files and my SCAL and Cricut to cut the shapes.


This last card used Certainly Celery, Taken With Teal and So Saffron CS and some more retired SU DP. I used the Botanicals Cricut Lite Cartridge for the flower and PDC Shaplies SVG files for the label. Happy Birthday is stamped using PTI's Birthday Basics.

Again, these had matching candy bars. I hope you've enjoyed these cards. I enjoyed making them!

Wednesday, September 29, 2010

INspired Crafter Saturday Scrapbook Sketch #20

This is my layout for Chris' scrapbooking sketch challenge, which you can find HERE. These pix are from this summer. Emily played softball in the YMCA kids' league. Her team was called The Butterflies. Someone observed that that wasn't a very intimidating name, and I said their motto could be "float like a butterfly, sting like a bee". I used 12 x 12 Kraft from Mike's, Night of Navy, Yo Yo Yellow and Real Red from SU, and PTI white. I used Just the Ticket and Journaling Lines stamp sets from PTI, plus their ticket die. Title is a free SVG I got off the internet and cut with SCAL and my Cricut. This is not the greatest page I've ever done, but I LOVE these pix of Ems, and I had a ton of fun making it. Thanks for stopping by!Posted by Picasa

Wednesday, September 22, 2010

Learning New Skills

So, okay, who'd ever have guessed that my crafting addiction would drag me kicking and screaming into the world of computer semi-literacy? It all started with Splitcoaststampers--learning to post my pix in the gallery and chat on message boards--then I had to have Cricut with Sure-Cuts-A-Lot, and now two talented ladies have forced me to go even further, into the world of Photoshop and Inkscape! Kay, whose amazing blog is Clever Someday (I love that title!) and Jin, who caught my eye with her gorgeous blog, Under A Cherry Tree, make beautiful projects using their computers and Cricuts, and are kind enough to share awesome video tutorials on just how to do it! I almost bought a Cricut Imagine, but with their tutorials, who needs it? LOL! Anyway, these are some things I've made using their ideas, tips and methods. And honestly, I'm just a little bit proud of myself for figuring it out! Both Kay and Jin use a lot of Lettering Delights Doodlebats and graphic sets. I had some LD stuff, but never used it because I don't really like to cut stuff out--but now all that's changed.

The first pic shows images from Around the World and Around the World Sites. I printed them on CS and used Kay's hinge method to cut them out. I'm not going to go into how I did it, as Kay and Jin do that so much better than I ever could. The second pic of the little alligator is from the Doodlebat Party Animals. Doodlebats are easier because you can use them right in SCAL without having to convert anything. Here I used Kay's method of drawing with a gel pen first using the cricut, then cutting with the cricut. So cute! This font will make so many cute kids' birthday cards!

Lastly, I found this cool doodlebat, Journaling Flourishes I think it's called. Again, I just opened it right in SCAL, but it was a little more complicated. I printed with brown on Kraft (Gina K), then I had to make a file for the cut, which involved getting rid of all the interior lines and just cutting the outline. But I did it! This was inspired by my friend Chris, who is a scrapbooker extraordinaire, and if she likes this sort of journaling tag, I will make some and send them to her. Just let me know Chris!

Depending on how things go tomorrow, I hope to have at least one card made using these images. I hope I've inspired you to try something new today. And Jin and Kay, if you ever happen to see this post, thanks a million!

Monday, April 12, 2010

Elegant Birthday
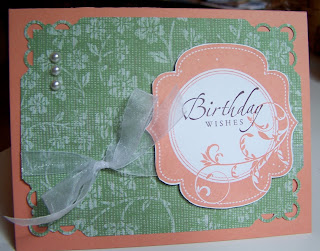
I got the Lovely Labels set from Gina K Designs a while back and haven't had a chance to play with it until today. I love the Nestabilities dies and am a sucker for any stamp set with images that coordinate with them. This is a particularly beautiful one. I stamped one of the labels (as it turns out, one I DON'T have the Nestie for, but not to worry!) in Groovy Guava. The SU set Sincere Salutations had greetings that went well with the style of this set and also fit in the space. I stamped it in Chocolate Chip. Card base is Groovy Guava, DP is Afternoon Tea, embellishments are organdy ribbon and pearls. I punched the corners with SU's new Scallop Trim corner punch. I love how this turned out and it was quick and easy too. Can't get much better than that! As I said, I don't have this particular Nestie, but I have discovered a wonderful lady, Penny Duncan, who designs SVG files for SCAL and Cricut. You can see her blog HERE. And she has made some that are Nestie shaped. Now I didn't use it here, I just cut out the image with scissors, but I will be using those files! For now, I hope you've enjoyed this card--have a great day!