Saturday, April 30, 2011

Have a ball!

Emily also had a sleepover birthday party to go to Fri. night (Brad and I went on a DATE! woo-hoo!). I made 2 cards for her to choose from, before remembering she had already made one for her friend weeks ago! I should have photographed it, but I forgot. It turned out really cute. Anyway, this is the first card I made. The second copy actually--I had a LOT of trouble with it for some reason. Either I or my machine kept messing up cuts. When I finally got all the layers cut, I put them together and managed to get glue all over everything. So, I started all over. But I'm very pleased with how it turned out. The seal and sentiment are from Birthday Bash.
I created a frame card in my Gypsy, using THIS TUTORIAL from She's a Sassy Lady's blog. I welded the seal and sentiment in Gypsy too. Then I cut the layers. I glittered the layers on the ball and his hatband with Doodlebug sugar glitter. I drew his nose and eyes with a marker. Anyway, I think this is adorable and will def. be making more, now that I'm aware of the pitfalls LOL! Happy Crafting!

Friday, April 29, 2011

Quick boy card

Matt has had two birthday sleepovers this week! The first one was kind of spur of the moment (the kids had a day off school on Wed), so I made an all black version of this card, with colored "buttons". So this time I got the idea to make a light gray layer and cuttlebug it with the diamond plate folder. I used the Wrap It Up cartridge and cut the card feature at 5.5" in length, which makes it shorter than 4.25, but I wanted it to fit in a regular A2 envie. The inside is stamped and embossed in red with Dude--you rock! from Verve. Matt signed it with my white gel pen. The buttons in the middle I made by punching a 1" circle from white and coloring with markers, then gluing it behind the holes. This is a pretty fast card to make, and I think it's really cute! Hope you've enjoyed it as well.
Thanks for stopping by today! Have a great weekend!

Monday, April 25, 2011

Mixology Crafts is having a giveaway of the E2

The Cricut Expression 2 Anniversary edition is launching pretty soon and there are several giveaways going on. I wanted to share one that is on Mixology Crafts. Go over and enter for a chance to win!

Friday, April 22, 2011

Wedding Card

My nephew is getting married this weekend, so I made this card. His fiancee's colors are Certainly Celery and brown (I picked Soft Suede). I used the Paper Lace cartridge to cut the brown and green layers at 4.8". The card itself measures 5.25" square and is made of Gina K Pure Luxury Ivory. I put a few drops of champagne shimmer paint (SU) in a mini mister and added rubbing alcohol to make my own shimmer spray--it's very sparkly IRL.
I stamped this image from the new SU set Four Frames in Soft Suede and colored the leaves with a Certainly Celery marker, and used a blender pen dipped in the shimmer paint to color the roses. The sent. is from PTI's Mixed Messages (the original, not the Mega). I sponged shimmer paint on the brown rose (Mike's) and attached it to the SU crocheted lace.
I also made the envelope using the MS scoring board I bought with a 50% off coupon at Mike's last Sunday. It worked like a charm! I hope they like this card. I got them some of their china for their wedding present. Can't wait to see everyone. Have a great weekend and a Happy Easter everyone. Thanks for stopping by!

Monday, April 18, 2011

Making my own embellies
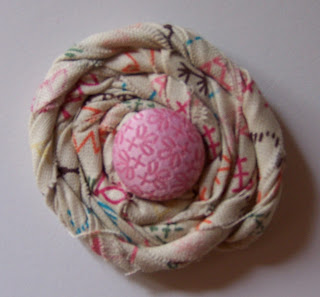
So I tried lots of different things the other day, and one of them was rolled ribbon or fabric flowers. I have this cool fabric from SU, plus coordinating fabric covered brads, so I thought I'd give it a try, and this is the result.
There are lots of tutorials on this, just google rolled ribbon or fabric flowers. I don't remember exactly which tutorial I used. I'm not thrilled with how it turned out; I think I need a lot more practice! Maybe I should also try it with ribbon.

This next one is a simple yo-yo. I die cut some of the fabric with my circle nesties and ran a running stitch around the outside of the circle and drew it up like a little drawstring bag. I added a brad. I think it's very cute! You can make them just about any size; this one used my next to largest Nestie and is about 1.25" in diameter.
Well, I had fun trying something new! Hope you've enjoyed this post--thanks for stopping by!

Sunday, April 17, 2011

Card Candy

Here is my submission for the card candy category of the current PTI Swap. We are to make 2 pieces for each set, six sets. The pieces can either be matching or coordinating. I am not a big floral person. My embellies tend to be fairly simple and plain, a ribbon or a couple of brads. But lately it seems that everyone has been adding large flowers to their projects. So I looked around online to find a tutorial on how to do some of these things. This first flower is a spiral flower. To make it I followed THIS tutorial. I used a 5" square of Raspberry Fizz Mix patterned paper. I cut a spiral and rolled, securing with glue dots and adding Crystal Effects at the end to hold it all together.
This next flower is from a Nicole Heady blog post, seen HERE. It is super quick and easy--the part that took the longest was die cutting all the felt flowers. I used the Beautiful Blooms II die, the large one and cut five flowers for each one. Fold 4 in half and half again, and stitch down to a flat flower. Add a button and some ribbon "leaves" and you're all set. I love how fluffy this flower is! It is from Rasp. Fizz felt. Buttons and ribbon are also PTI.
Here they are together. These are both fairly large. I'd guess the felt flower is about 2" in diameter, not counting the leaves, and the spiral rose is about 1.5". I only had enough felt to make 7 flowers, so that is why there is only one per set. But I think the spiral rose is cute too.
I'm pleased with how these turned out. Hope you like them too and learned something today. While I was fooling around with making my own embellies, I did a couple of others; I will post them tomorrow.

Thursday, April 14, 2011

PTI 2011 Color Combo Swap

The PTI swap I often participate in has a new round up--you can read about it HERE. One of the categories is to use one of the 2011 color combos from PTI, seen HERE. The only combo I had all the colors for was this one: Ripe Avocado, Ocean Tides, Dark Chocolate, and Vintage Cream--I don't have a lot of PTI's newer colors due to the lack of ink to match. I really like this combo though, so it's okay.
I also knew I wanted to ink up one of my latest acquisitions, Little Bitty Bird, with matching die. I die cut the birds from OT, stamped the birds on them in Dark Chocolate hybrid ink, and colored their wings with a Versamarker. The leaves on the branch are colored with a SU Old Olive Marker, which is pretty close to RA. I wanted a sort of Romeo and Juliet theme, so I have the male bird offering the female a flower. I expect she'd rather have a worm, but the set didn't come with one of those! The DP is PTI's Green Tea Leaves, how I love that paper. It's mounted on RA CS. Scallops are punched with SU punch as is the sent. (Modern Label punch). I inked the edges of the sent with Dark Chocolate ink. The jute and coconut shell button are PTI, although I don't think they sell those buttons anymore, and the card base is Vintage Cream CS. I'm pleased with how this turned out--not too fancy, but I think it would be suitable for lots of occasions. Hope you've enjoyed this card as much as I enjoyed making it! It's been a while since I played with PTI, I had a good time with it!

Tuesday, April 12, 2011

My Other Brother's Birthday Card

Yes, I have twin brothers! Their birthday is the same as my SIL's and HER brother's (who was born the same day she was, 1 year later). I don't send Lori's brother a card, but everyone else gets one, so April is a busy month. This brother is getting ready to retire from the Army! Yay! At least one I won't have to worry about getting blown up. Probably. Anyway, I used the Cricut Nifty Fifties cart. He and his wife recently attended a 50's costume party and posted pix on FB. They looked so cute, so I decided to use this. The inside says "Get your kicks". Colors are Soft Sky, Real Red, Basic Black, and Whisper White. DP is retired SU Western Sky.
Hope he likes it--Thanks for looking!

Monday, April 11, 2011

My Brother's Birthday Card

This is the card I made for my brother who is currently in Iraq. At first I was going to do a military-type card, and then I thought, maybe he'd like something that reminded him of something OTHER THAN the Army. This stamp set is called Set Sail, and retired long ago. I used Soft Sky, Blue Bayou, and the DP is called Western Sky. All of it is retired, as are the eyelets. I think the only thing on this card that is not retired is the River Rock CS, the hemp, and the white gel pen I used to accent the seagulls. The bottom ships are stamped in Ruby Red (retired!).
I distressed the edges of some of the layers. I hope he likes this card. Thanks for stopping by today!

Sunday, April 10, 2011

Stamping Club Swap

Hi everyone, today is my SU stamp club, and the members make swaps for each other. This is mine for this month. CS is Very Vanilla, Basic Black, and Daffodil Delight, SU's new yellow. I like it pretty well. I wanted to die cut some butterflies out of the First Edition DP and stamp the damask design from the SAB set Bliss on it in black. But I needed another color, so I went to my trusty color coach, which suggested DD. I wouldn't have thought of it myself, but I absolutely love it! I added pearls to the butterfly and stamped the damask element on the BG as well. Another new thing for me--I used the black craft ink. Normally I am not a big pigment ink user, but my hybrid ink was not opaque enough on the DP, so I went to the craft ink. I really like it. You just have to be SUPER careful not to smudge! Either dry it with your heat tool (or emboss it) or let it sit overnight.
The sentiment is from a retired SU set. I just went and looked up the name and now I can't remember it--getting old is not for sissies! (ETA: It's called Warmest Regards.) I used the square lattice embossing folder on the DD strip. I'm very pleased with how this card turned out! Thanks for stopping by today. Hope you get some crafting time!

Saturday, April 9, 2011

Umbrella Card

I made this card for my SIL's birthday, and also for the Fantabulous Cricut challenge this week, which was to use an umbrella cut on your card. The umbrella is from Wild Card, the scalloped layer is from Just Because, and the flowers are from Freshly Picked. I cut the flowers out 3 times (they are in a pot) and fit them into the umbrella. In retrospect I should have put the middle flowers in front of the umbrella handle--it looks a bit odd with the flowers behind it. Patterned paper and ribbon is retired SU, sentiment is from SU's Something to Celebrate, and it is stamped on a Nestie double ended tag. CS colors are Pretty in Pink, Pink Pirouette, Certainly Celery, and Old Olive.
I sponged the edges of the scalloped layer and the flowers and the ribbon tag. Thanks for stopping today!

Monday, April 4, 2011

More Gypsy Cards

Good morning! I really had fun making this shaped card with my Gypsy. All cuts are from Create a Critter. In my last post I said the Gypsy would keep me from wasting so much CS. That proved not to be the case here: I goofed up the card base TWICE before I got it right. Then I goofed up the sand and water layers too! BUT I learned from my mistakes, so it's all good. The card base and water are Tempting Turquoise, bowl is Cool Caribbean, sand is Crumb Cake speckled with Soft Suede, plant is Old Olive (I drew veins on with a marker and sponged edges). Fish is Lemon Tart (PTI), Pretty in Pink, and Pumpkin Pie, all layers covered with the appropriate color of Doodlebug glitter. I just love that little glittery fish! Another think I discovered about the Gypsy is that you can't really use the markers with it, because using the markers involves hitting the load mat button after you have drawn with the markers, and you can't do that with the G. I kind of got around it by unloading the mat but not moving it and hitting the load mat button again. It worked--kind of--THIS time. I won't count on that again. I'm going to shoot an email to PC and tell them to fix that for the next update. The inside has the sent. "birthday fishes" from PTI's Pond Life Sentiments.

This card I made using Stretch your imagination. It made doing the layers easier, and I could size my card to a 3 x 6 (which I probably could have done with the cartridge alone). I used the retired SU BG stamp Stipple Plaid and Chocolate Chip ink. Let's just pretend the incomplete pattern on the right side is "distressing", shall we? And let's also say that the reason I lined the inside with more Crumb Cake layered on Choc Chip is NOT because I forgot to mask the inside when I stamped the plaid BG LOL! I have been gaining a lot of wisdom lately! Layers are Summer Sun and Old Olive. I sponged the leaves (of course) and colored the center of the sunflower with a Choc Chip marker. Ribbon is PTI, button is SU.
That's it for today--thanks for taking a look!

Sunday, April 3, 2011

Baby Cards!

A friend of mine at work is having twins! So I made him a baby card with my Cricut. Unfortunately it's not pictured here because it's at work waiting to be signed by people. But I had so much fun making it that I made several other baby cards (just so I'd have some on hand--not that I need them very often!). The first one I got the idea for somewhere--she had used punch art to make the rubber duck. I used Wild Card for the duck and Life's a Beach for the waves. The stamp is from the SU Sale-a-Bration set Punch Bunch. I colored it with markers: Pumpkin Pie, Ballet Blue, and Summer Sun. The duck is cut out of SS CS and his bill is colored with the PP marker. Card base is PTI white.
Then I made this one! I just love giraffes, and I had this retired SU paper called Cutie Pie, still one of my all time favorites! It's almost gone, boo-hoo! The giraffe is cut from Create-a-Critter, the sent is from Wild Card (I think). I used Nesties for the Bashful Blue panel. I wish I had embossed the panel but oh, well. I plan to make a girl version of this card--I'll do it then. This is a 3 x 6 card; I really like that size for a change of pace from A2's. Card base is PTI white.
I saved the best (IMO) for last. I have a confession to make--I bought a Gypsy! I am embarrased at spending the money but it was on sale for a really good price and I couldn't pass it up! The Cricut users community has lately been rocked by the news that Provo Craft has won its lawsuit against Make the Cut and is currently suing SCAL (which I use). If I don't update my SCAL, I can still use it with my Cricut. BUT I do like a lot of the images on Cricut cartridges, and of course I can't use them with SCAL. So I got the Gypsy, and I must say, I love it! I can sit in front of the TV and design a project without wasting a scrap of CS (in theory anyway--more on that later LOL!) But at first I couldn't figure out quite what to do with it. So I started sniffing around for some tutorials, and THIS is what I found. And I was hooked. This is so much fun! Frame and saying are from Gypsy Wanderings, which comes preloaded on the Gypsy, and the bottle and block are from Wrap it Up. Here I've used Bitty Baby Blessings DP from PTI. Lavender and yellow CS are also PTI, Certainly Celery and Pumpkin Pie are SU. I inked the edges of the sent with Perfect Plum ink (SU).
Thanks for stopping by today. I hope everyone has a great day!

Friday, April 1, 2011

Spring is HERE!


I made this card for the Fantabulous Cricut challenge this week. The theme is--you guessed it--spring! This card measures 5.25" square. Card base is Gina K Pure Luxury Heavy Base Weight white. I used the Cricut Lite cartridge Bloom for the fence and tree, and Give a Hoot for the bird (it's the one on top of the evergreen tree). I sponged the edges of the fence with Bashful Blue ink, popped it up on foam tape, and used pink stickles for the flower centers on the tree. Sent. is from SU Something to Celebrate and is stamped in Marina Mist. Tree and flower leaves are also sponged. It's truly amazing how much sponging can add to a Cricut cut! I love how this card turned out! Hope you like it too--thanks for stopping by today!